Evaluate Model Quality (EvaluationRun)
This step measures per-model accuracy and response performance. Use it for comparing models or validating performance after NPU compilation.
Evaluation proceeds in the order: Register Dataset → Define Evaluation Method → Run Evaluation.
1. Register a Dataset
In the left sidebar, click Resources > Datasets.
Click the + Create Dataset button in the upper right and enter:
| Field | Value |
|---|---|
| Name | tutorial-eval |
| Version | main |
| Description | (optional) |
Click the created Dataset to go to the detail screen, then in the Current Info tab click the + Add/Replace Data button in the upper right.
Choose a data source
Two data sources are supported: HF dataset and JSONL dataset.
- HF dataset: pull a dataset directly from the Hugging Face Hub.
- JSONL dataset: upload a JSONL file you prepared locally.
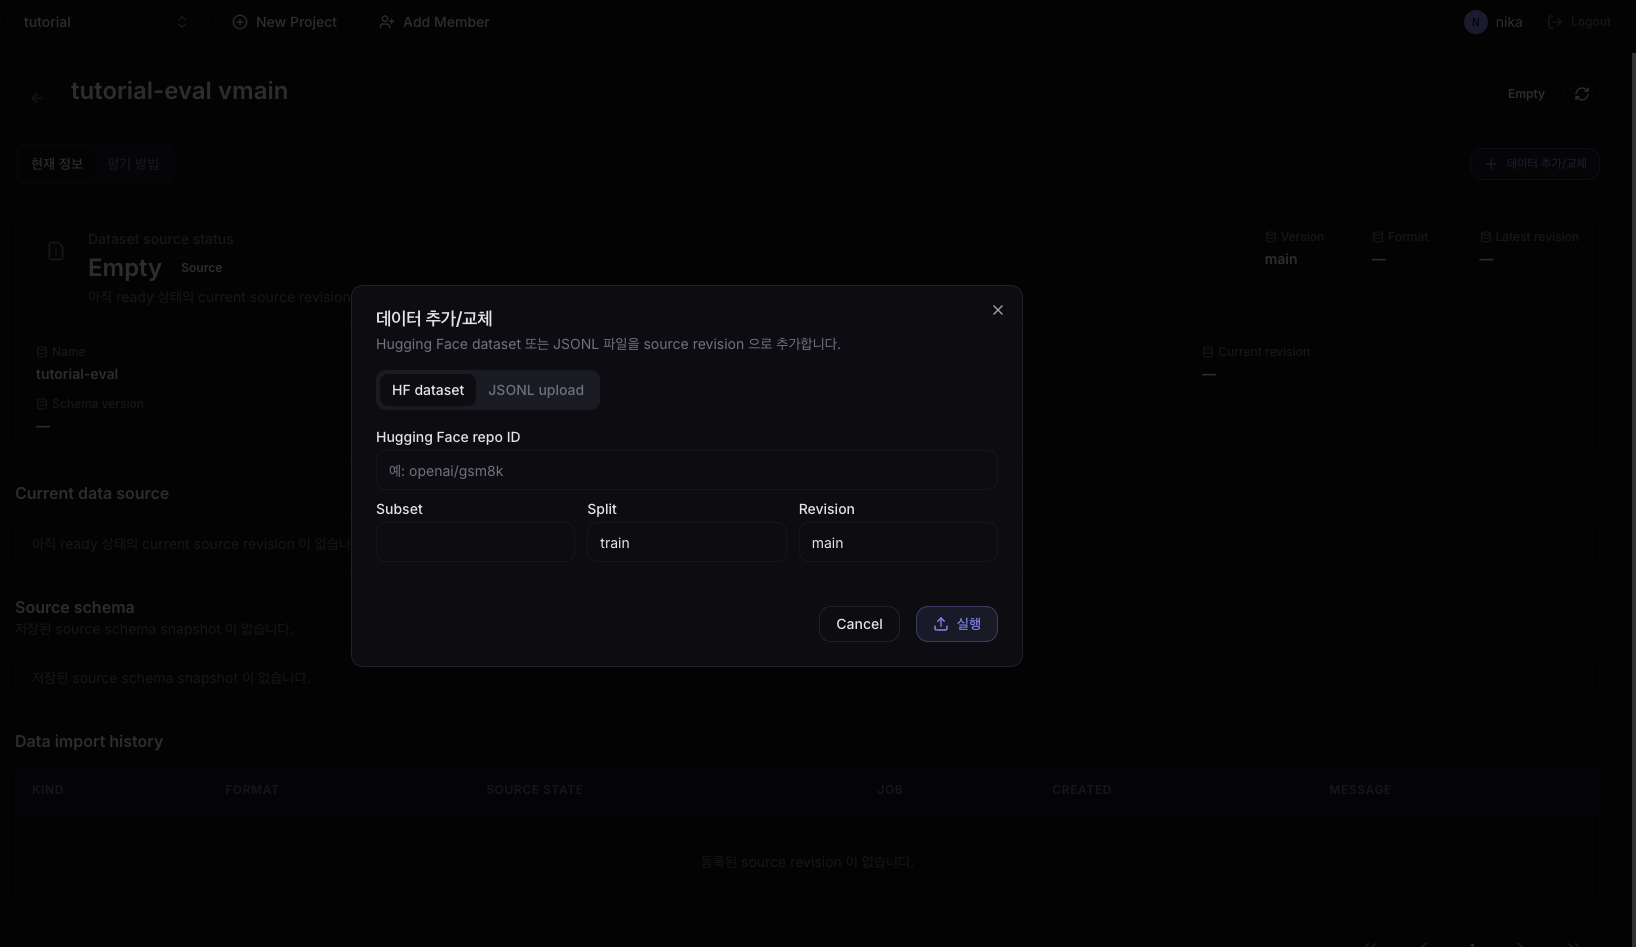
When using an HF dataset
Select HF dataset and enter:
| Field | Value |
|---|---|
| Hugging Face repo ID | openai/gsm8k |
| Subset | main |
| Split | train |
| Revision | main |
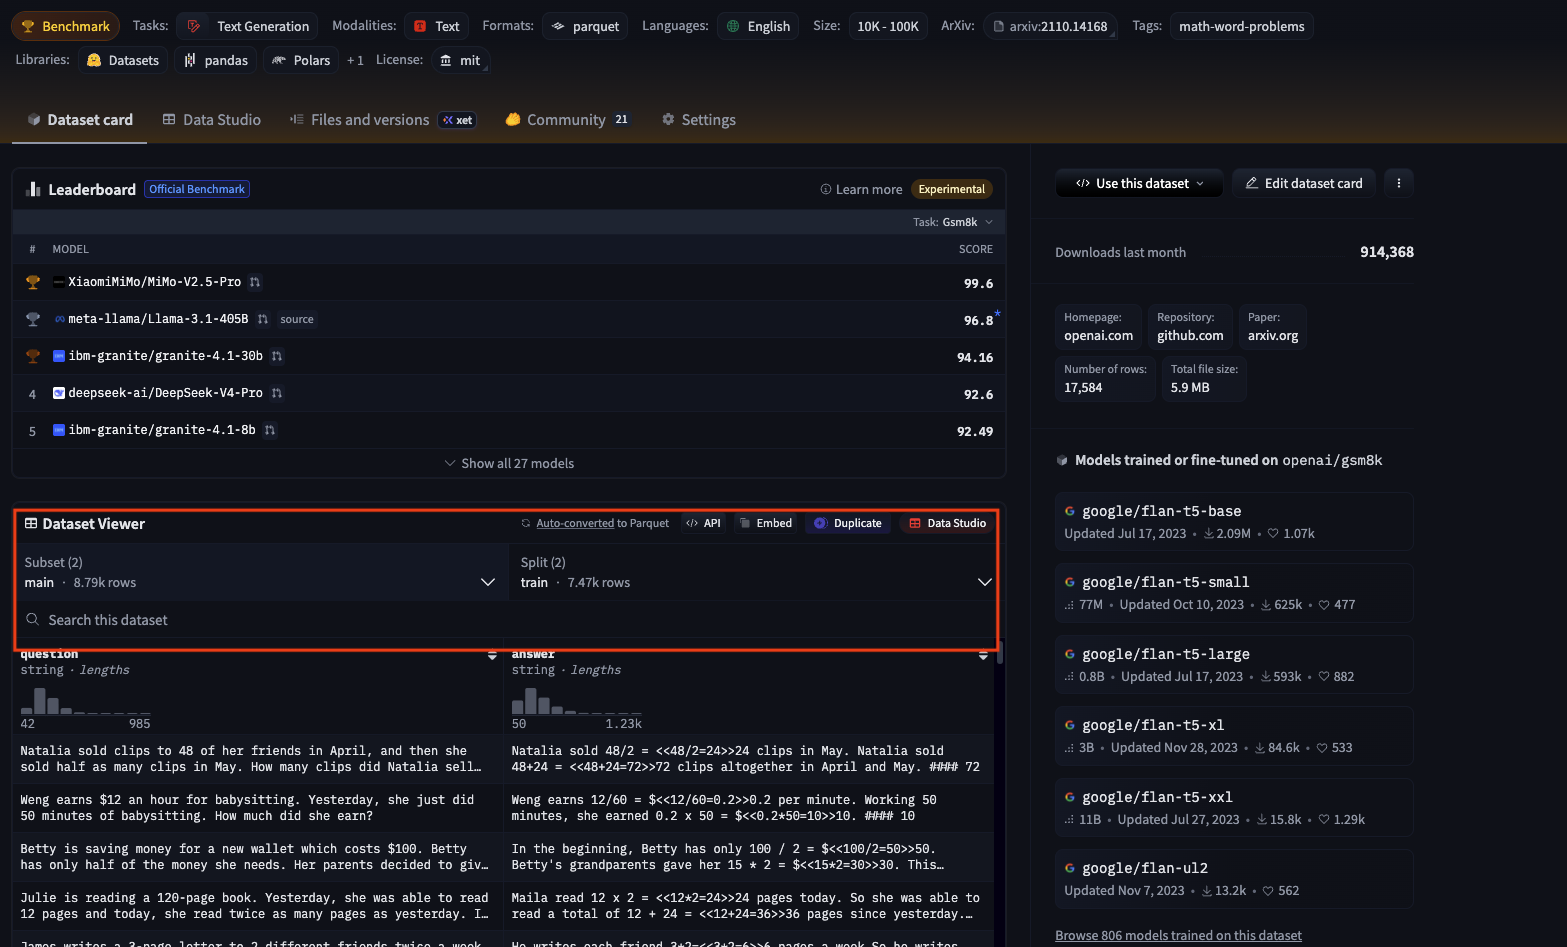
These fields take values you can find on the Hugging Face dataset page, and can be changed freely to match the dataset you want to evaluate.
Click the Run button to pull the dataset. When the job completes, the status changes to Ready.
When using a JSONL dataset
If you want to evaluate data you already have, select JSONL dataset. Prepare it as JSON Lines where each line is a single evaluation sample.
{"input": "What is 2+2?", "expected_output": "4"}
{"input": "Capital of France?", "expected_output": "Paris"}
{"input": "Color of the sky?", "expected_output": "Blue"}
input: the question/prompt given to the modelexpected_output: the expected output to compare as the answer
Create a separate Dataset (e.g., tutorial-eval-jsonl), choose JSONL dataset in + Add/Replace Data, and upload a file in the format above. From there the flow is the same as the HF dataset case — wait for the status to become Ready.
2. Create an Evaluation Method
In the Dataset detail screen, click the Evaluation Methods tab and press the + Create Evaluation Method button.
The form is built based on the Dataset's source schema, so the fields you must enter differ depending on whether you used an HF dataset or a JSONL dataset. Follow the guide for the Dataset type you used.
For an HF dataset
If you're proceeding with an HF dataset (e.g., openai/gsm8k), you'll see the screen below.
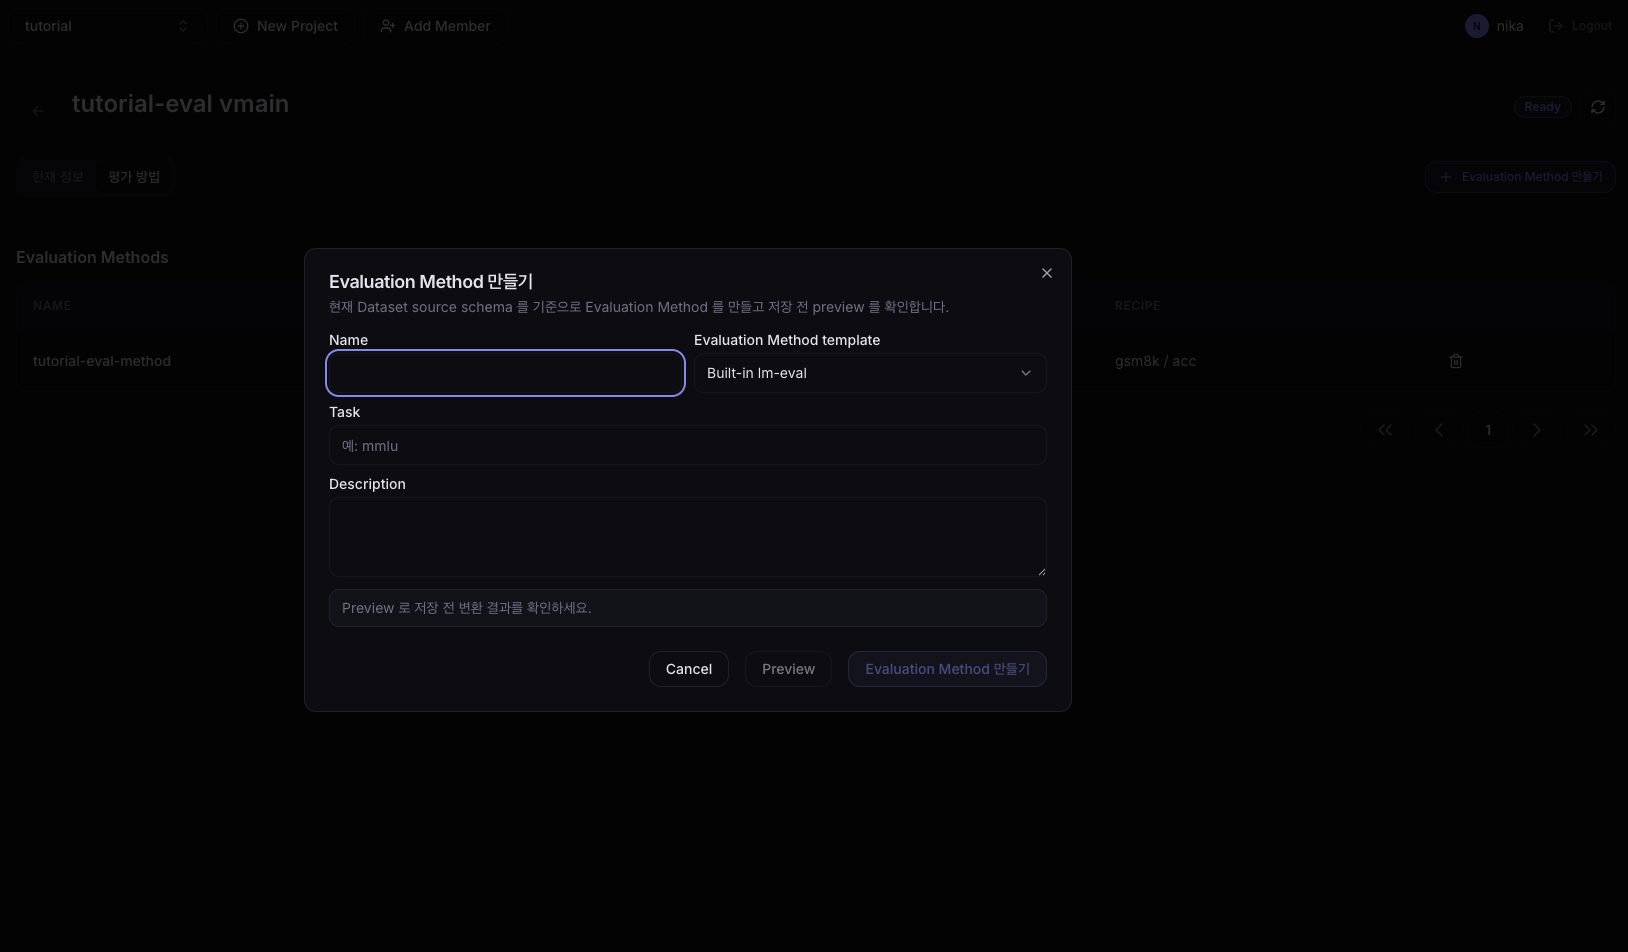
| Field | Value |
|---|---|
| Name | tutorial-eval-method |
| Evaluation Method template | Built-in-lm-eval |
| Task | gsm8k |
| Description | (optional) |
Field meanings:
- Evaluation Method template: the template that defines which evaluation approach to use. For HF standard benchmarks, use
Built-in-lm-eval. - Task: the task name defined in lm-eval-harness. To evaluate gsm8k, enter
gsm8kexactly (typos cause the evaluation Job to fail).
Verify the settings in Preview and click Create Evaluation Method.
For a JSONL dataset
If you're proceeding with a JSONL dataset, you'll see the screen below. Unlike the HF screen, fields appear that let you specify which JSONL keys to use as input/expected output.
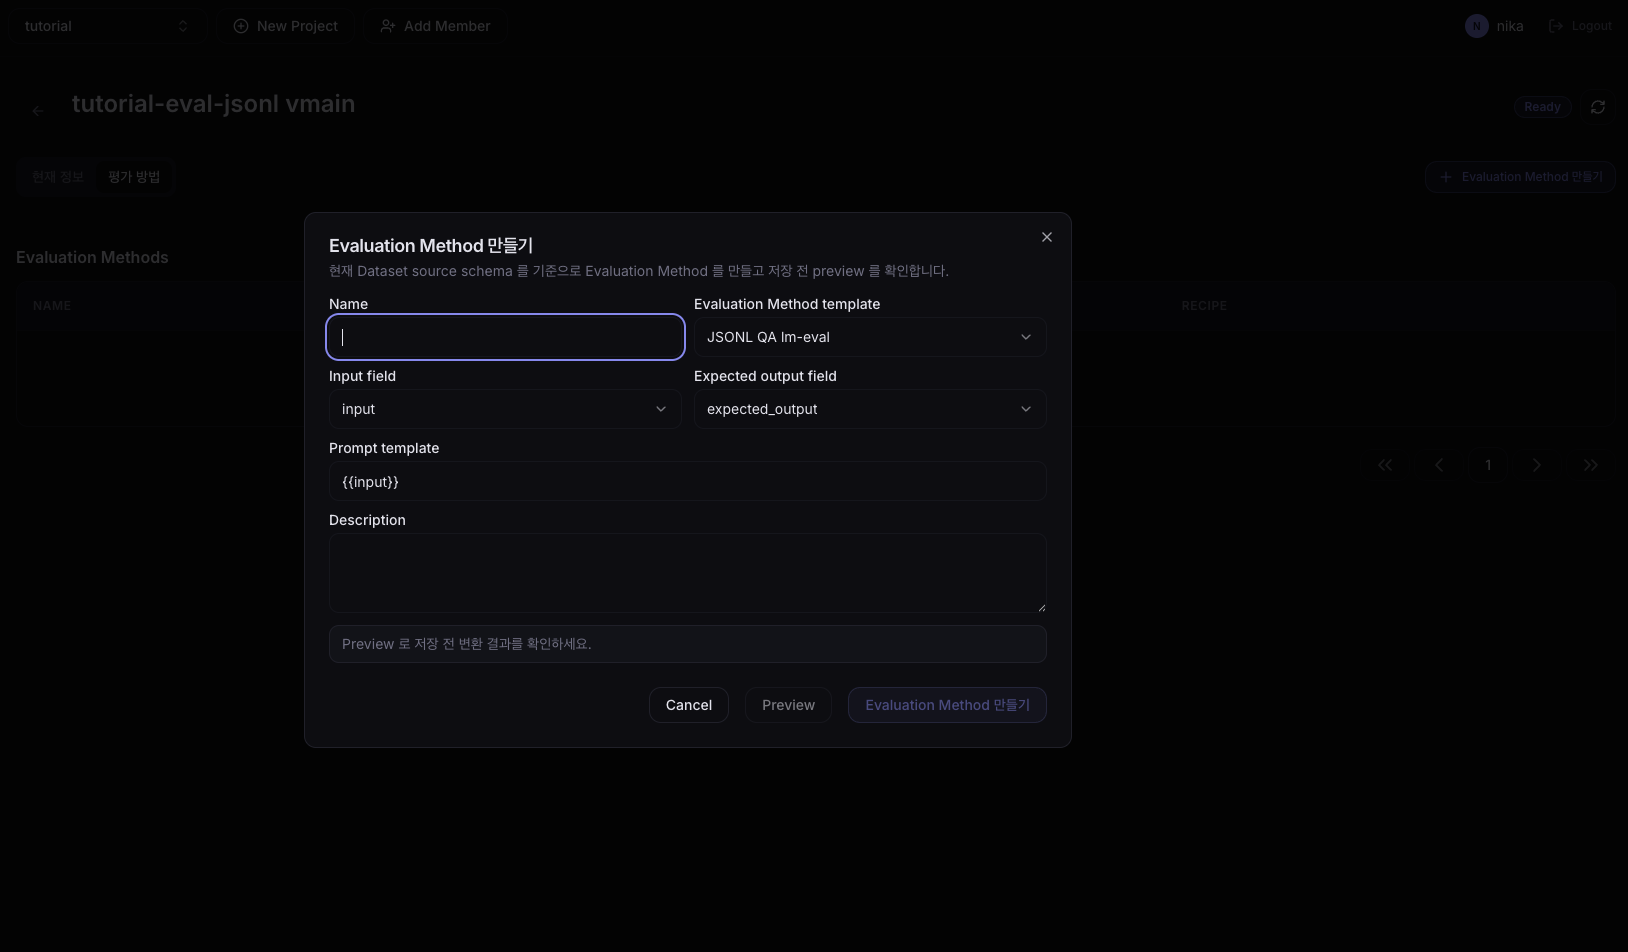
| Field | Value |
|---|---|
| Name | tutorial-eval-jsonl-method |
| Evaluation Method template | JSONL QA lm-eval |
| Input field | input |
| Expected output field | expected_output |
| Prompt template | {{input}} |
| Description | (optional) |
Field meanings:
- Evaluation Method template: for JSONL, generally use
JSONL QA lm-eval. - Input field / Expected output field: the key names in each JSONL line used as the model input and the expected answer. For the example JSONL above, these are
inputandexpected_outputrespectively. - Prompt template: the actual prompt shape sent to the model. The
{{input}}placeholder is replaced with the JSONLinputvalue. Edit this template when you want to wrap the input with system instructions or extra context.
Check the actually-filled prompt and expected output in Preview, then save. The subsequent evaluation flow is identical to the HF dataset case.
3. Run Evaluation
Click the Eval button on the screen above to open a 3-step wizard.
Step 1. Select Dataset
Select the Dataset to evaluate. Pick the one you registered earlier, matching the Dataset type you used.
- For an HF dataset:
tutorial-eval - For a JSONL dataset:
tutorial-eval-jsonl
Step 2. Select Evaluation Method
Select the Evaluation Method that defines how to evaluate. Pick the Method you created earlier, matching the Dataset type.
- For an HF dataset:
tutorial-eval-method(Built-in-lm-eval, task=gsm8k) - For a JSONL dataset:
tutorial-eval-jsonl-method(JSONL QA lm-eval)
Step 3. Column mapping and run options
Shows which Dataset columns connect to the input columns the Evaluation Method requires (e.g., question, answer). Datasets that follow a standard schema like gsm8k work fine with the defaults. Adjust the mapping only when your Dataset uses different column names or you want to substitute another column for some field.
Next, review the evaluation run options. Each option means:
- Limit (optional): cap on the number of samples to use in evaluation. Leave empty to use the whole Dataset. Set a small value (e.g., 10) to quickly verify it runs.
- Batch size: the input batch size sent to the model at once. Larger values increase throughput but use more memory. Start with
1. - Concurrent request count: number of requests sent concurrently to the serving endpoint. Higher values speed up evaluation but increase load on serving resources. Start with
1. - Few-shot count (optional): the number of examples to include in the prompt. Reasoning tasks like gsm8k typically use 5–8, but leaving it empty uses the default defined in the Evaluation Method.
- Serving CPU / Serving memory / Serving accelerator count: resource requests for the serving Pod brought up temporarily for evaluation.
The defaults are fine. Adjust only the values you need based on the descriptions above, then run the evaluation.
4. Check Results
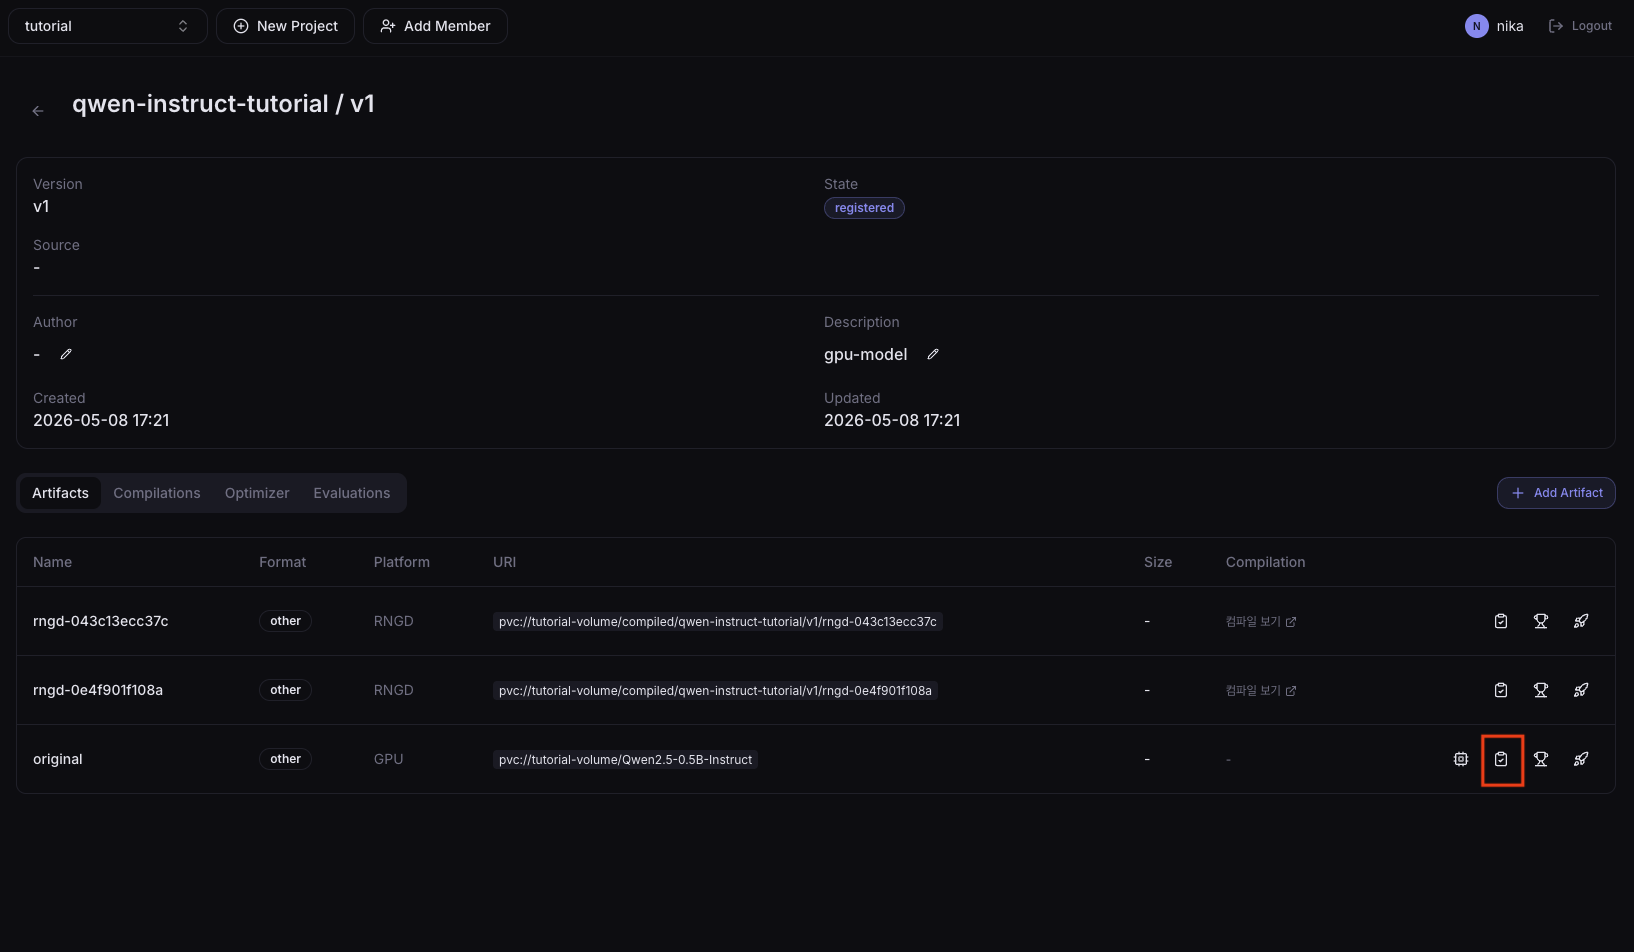
Click the Evaluations tab in the left sidebar to see the list of running/completed evaluations. When an evaluation completes, the status becomes Succeeded; click the result to view detailed metrics.
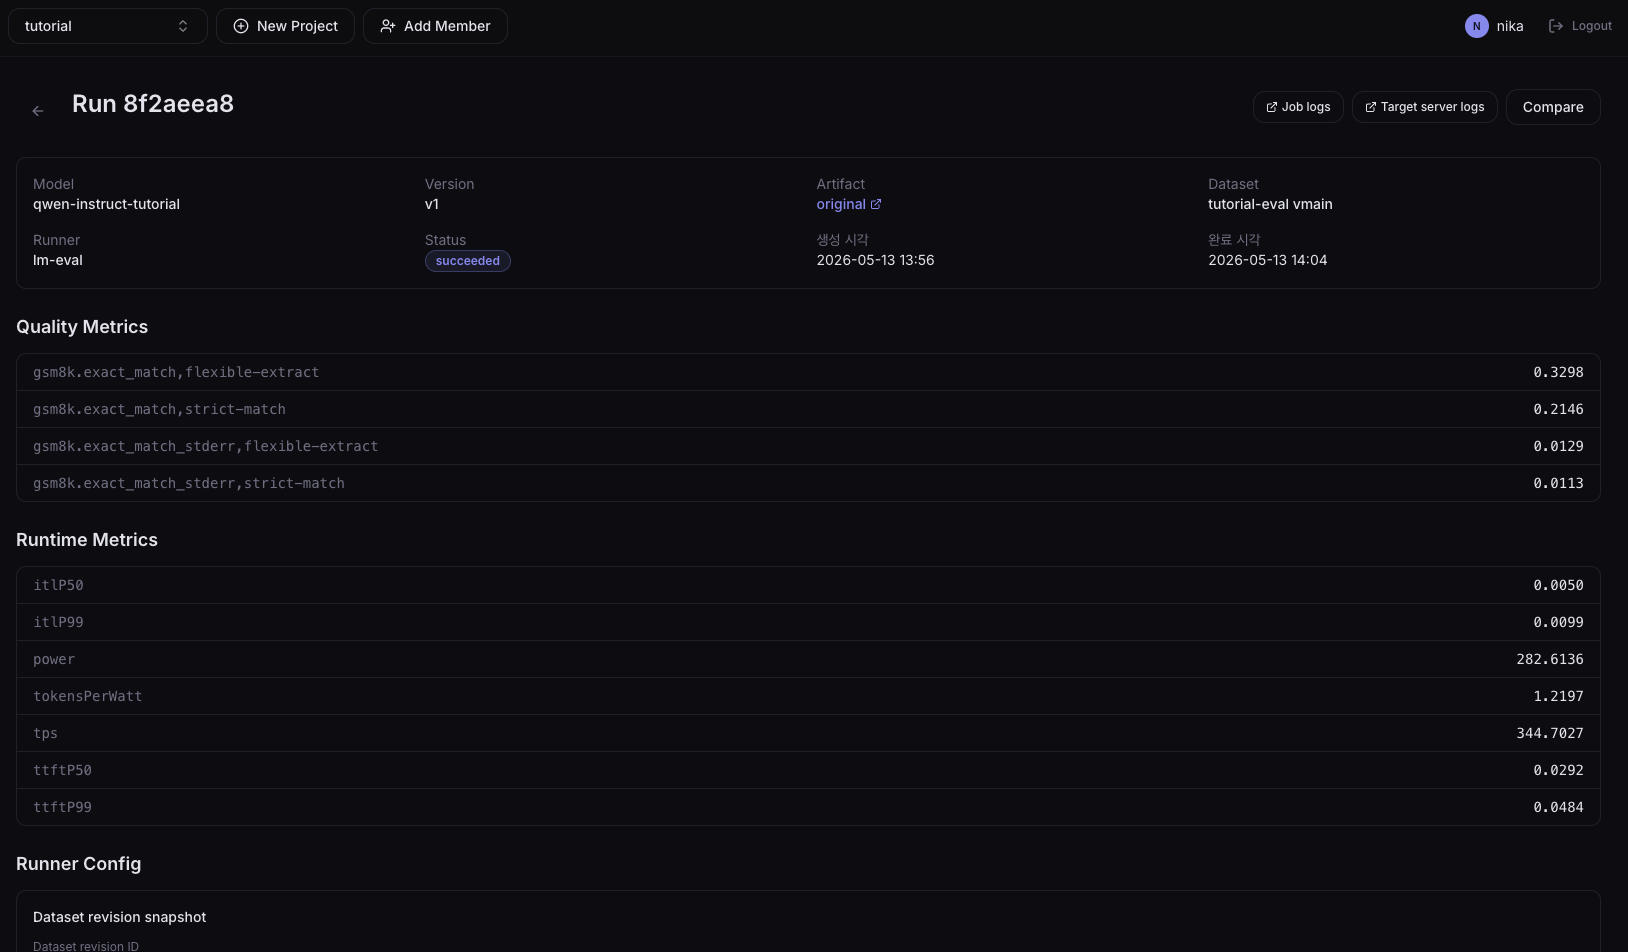
The metrics on the detail screen split into Quality Metrics (model accuracy) and Runtime Metrics (serving performance).
Quality Metrics
Metrics that show how often the model got the answer right. Metric names are in the form <task>.<metric>,<filter>, and for the same result, scores extracted by different methods are shown together.
gsm8k.exact_match,strict-match: accuracy when extracting the answer strictly from the model's output. The answer is counted only when its format matches exactly the pattern the evaluation script expects.gsm8k.exact_match,flexible-extract: the same accuracy computed with a more lenient extraction rule. The answer is accepted even if formatted slightly differently, so scores are typically higher thanstrict-match. A large gap signals that the model knows the answer but doesn't quite produce the expected output format.gsm8k.exact_match_stderr,*: the standard error of the accuracies above. Smaller sample sizes or higher result variance make this value larger. When comparing two models/artifacts, a difference smaller than stderr may not be statistically significant.
Runtime Metrics
Performance metrics measured at the serving Pod brought up during evaluation.
ttftP50/ttftP99(seconds): Time To First Token. Median (P50) and 99th-percentile (P99) time from request to first returned token. Drives perceived response latency.itlP50/itlP99(seconds): Inter-Token Latency. P50/P99 of the gap between successive tokens after the first, indicating streaming response speed.tps: Tokens Per Second. Output tokens per second (throughput). Higher is better.power(W): average power consumption measured during evaluation.tokensPerWatt: tokens generated per watt (efficiency, equivalent totps / power). For the same model, NPU (rngd) artifacts typically score higher than GPU.
5. Compare Results (GPU vs NPU)
NPU compilation can slightly change accuracy compared to GPU due to quantization and operator substitution. Before rolling out to production, evaluate the same model's GPU artifact and NPU compile result on the same Dataset and directly compare the two results.
Prepare the comparison evaluation
Run two evaluations against the same Dataset (tutorial-eval). Both evaluations must use the same Evaluation Method to align the results 1:1.
| Run | Target artifact | Dataset | Evaluation Method |
|---|---|---|---|
| Run A | GPU (base) | tutorial-eval | tutorial-eval-method |
| Run B | NPU (compile result, e.g., rngd) | tutorial-eval | tutorial-eval-method |
Compare screen
When both evaluations reach the Succeeded state, select the Runs to compare from the Evaluations list and click the Compare button.
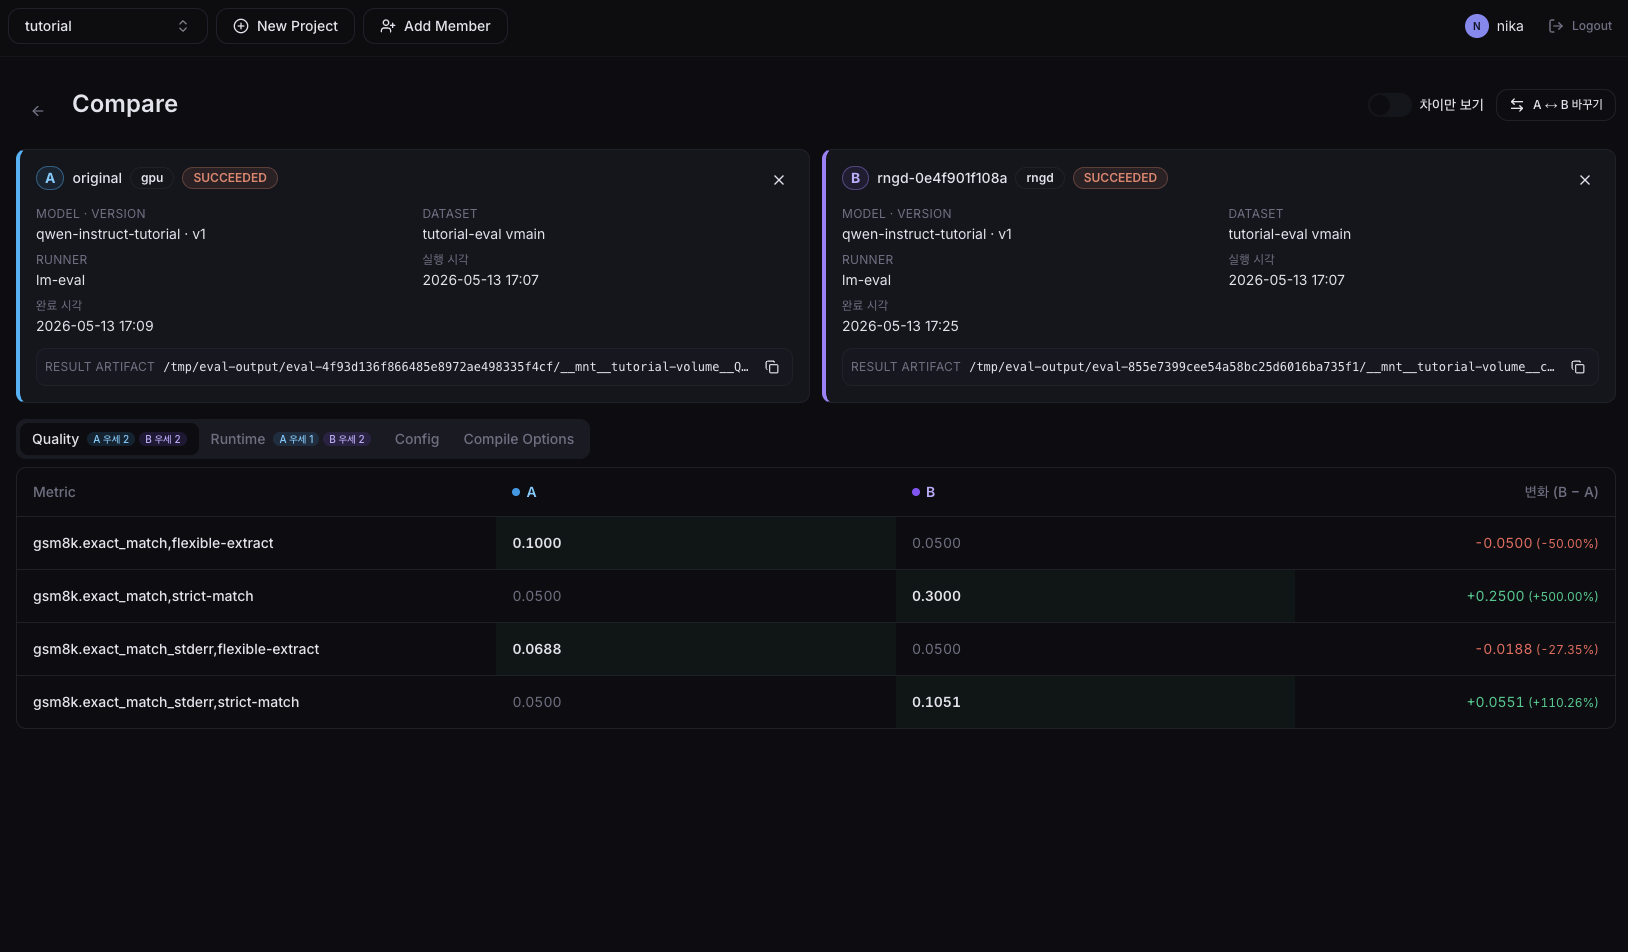
The comparison screen shows Quality Metrics and Runtime Metrics for the two Runs side by side, letting you see at a glance:
- Accuracy loss: how much Quality Metrics such as
gsm8k.exact_match,strict-matchhave changed versus GPU. If the difference is within theexact_match_stderrrange, the two can be considered statistically equivalent. - Speed/efficiency gain: how much faster and more efficient the NPU is versus the GPU on Runtime Metrics like
tps,ttft, andtokensPerWatt.
Next Step
→ 07. Deploy Model Serving — Deploy on NPU or GPU